Learning React: Custom Notification-System with Context

Displaying a notification to the user is typical for web applications. Let me show you how we can leverage React Context to build a global, customizable Notification-System.
To give you a high-level overview of this article, we will:
- Create a
Notificationcomponent that can hold and display one single notification - Create a
NotificationManagercomponent that can display several notifications and remove them again - Make the
NotificationManageravailable from all / most components (by using Context)
In contrast to many other tutorials, I am not giving you a huge project on GitHub. The focus here is on learning and not on copying. I'll also assume you have a React app that is able to run.
I am using react with TypeScript. I recommend everyone to give it a shot, but this is not a debate about TypeScript vs JavaScript. For those of you who don't use / know TypeScript, you should be able to understand the code and construct a JavaScript version fairly easily.
I'll style my notification component with Tailwind CSS - as this is purely cosmetic, you can choose any other CSS framework of course or none at all. In this project I am also using Fontawesome for Icons - the button to close a notification is a FontawesomeIcon component, you can simply replace it by any other HTML element if you are not using it.
If you have any questions while reading through this, simply hit my Twitter DMs and I'll answer them as soon as possible, promise!
Notification Component
I did some basic styling for a notification component with different colored versions to indicate an error, warning, success or information. Here's the one for success:
<div className="m-4 border-l-4 border-green-400 bg-green-100 rounded-sm shadow px-6 py-4 relative">
	<div onClick={props.onClick} className="absolute text-green-900 top-0 right-0 pt-2 pr-3 cursor-pointer">
    	<FontAwesomeIcon icon={faTimesCircle}/>
    </div>
  <p className="text-lg font-bold text-green-900">{props.title}</p>
  <p className="text-green-900/80">{props.content}</p>
</div>
I return this jsx if the type prop of the component is "success" and a similar version (different colors) for the other types.
You should be able to render the component in place with some static values now:
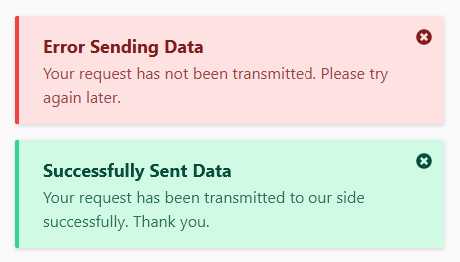
<Notification title="Successfully Sent Data" content="Your request has been transmitted to our side successfully. Thank you." type="success" onClick={()=>alert("you clicked close")}/>This should render a notification (inline) with the given title and content that will alert you when you click its close button.
NotificationManager Component
We don't want to render those Notification components in each component that generates them individually. This would yield the problem that if more than one component shows a notification, they would overlap because you would probably render both with a fixed position.
In order to counter that behavior (and for clean code) we are moving that into the NotificationManager.
The NotificationManager will keep an array of notifications that will be rendered, and it will also handle the onClick event of those rendered notifications, so it can remove them again:
// the interface export is TypeScript-specific
export interface NotificationData {
  title: string,
  content: string,
  type: "success" | "error" | "warning" | "info"
}

const NotificationManager = () => {
  const [notifications, setNotifications] = useState<Array<NotificationData>>([]);

  return (
  	<div className="fixed bottom-0 max-w-xl">
  		{notifications.map(notification =>
  			<Notification key={notification.content} {...notification}
  				onClick={() => {
  					const index = notifications.indexOf(notification)
                      const clone = notifications.slice();
                      clone.splice(index, 1);
                      setNotifications(clone);
                }}
            />
  		)}
  	</div>
  );
};

export default NotificationManager;
As you can see, we iterate through the notifications array and render all of them. The component itself will render in a position: fixed style at the bottom and with a given max width.
The onClick property of the Notifications is set to a function so that the clicked notification will be removed.
To test this, you can initialize the notifications state like this:
const [notifications, setNotifications] = useState<Array<NotificationData>>([{
	title: "Successfully Sent Data",
    content: "Your request has been transmitted to our side successfully. Thank you.",
    type: "success"
},{
	title: "Error Sending Data",
    content: "Your request has not been transmitted. Please try again later.",
    type: "error"
}]);You should see 2 notifications and be able to remove them upon click on the cross.
NotificationManager with Context
For now, we can't add notifications from other components yet.
Let's add an addNotification function inside the NotificationManager component just below the getter and setter of the notifications:
const addNotification = (notif: NotificationData) => {
	setNotifications(notifications.concat(notif));
}We could pass the addNotifiation function down the component tree, but this is cumbersome and error-prone. Here's a quote from the context documentation:
Context provides a way to pass data through the component tree without having to pass props down manually at every level.
This is what we need React Context for. We will create a so called ContextProvider with the addNotification function as the value and let other components consume this context in order to get the addNotification function.
We need this to be callable by other components, so we create a context. We create this context outside the component, since we can't export something inside a component.
export const NotificationContext = React.createContext((notif: NotificationData) => {});

const NotificationManager = ()=>{
	// ...
};
export default NotificationManager;We are creating a new Context with the createContext method. This method takes one argument, which will later be accessible to all ContextConsumers.
We would like to pass our addNotification function here, but we can't reference it since its scope is inside the NotificationManager component.
Therefore, we just provide an empty function as the default. Then, inside the NotificationManager's output, we wrap everything inside <NotificationContext.Provider></NotificationContext.Provider> tags like this:
return (
	<NotificationContext.Provider value={addNotification}>
    // ....
	</NotificationContext.Provider>
);This will allow us to change the value from the empty function to our addNotification function.
Since the context can only be consumed by components which are inside the <NotificationContext.Provider></NotificationContext.Provider> tags, we will make our NotificationManager component a parent component like this:
const NotificationManager: React.FC = (props: React.PropsWithChildren<{}>) =>{
  const [notifications, setNotifications] = useState<Array<NotificationData>>([]);

  const addNotification = (notif: NotificationData) => {
    setNotifications(notifications.concat(notif));
  }

  return (
      <NotificationContext.Provider value={addNotification}>
        {props.children}
        <div className="fixed bottom-0 max-w-xl">
          {notifications.map(notification =>
              <Notification key={notification.content} {...notification}
                            onClick={() => {
                              const index = notifications.indexOf(notification)
                              const clone = notifications.slice();
                              clone.splice(index, 1);
                              setNotifications(clone);
                            }}
              />
          )}
        </div>
      </NotificationContext.Provider>
  );
};You can see that we are rendering {props.children} inside the provider. This will be equal to whatever we will put inside the <NotificationManager></NotificationManager> tags.
We can then use the NotificationManager component as a wrapping component, similar to how you would use a Router component or other providers:
<NotificationManager>
	<Router>
    	// ...
	</Router>
</NotificationManager>After this setup, you'll end up with a very convenient way to add notifications that stack correctly and are removable by click:
const SomeComponent = () => {
  const addNotification = useContext(NotificationContext);

  return <div>
  	<button onClick={()=>{
    	addNotification({title: "...", content: "...", type: "success"});
    }}>
    	Click Me
    </button>
  </div>
};We are simply fetching the NotificationContext with the useContext hook and have access to this function in our component. Every component which has our NotificationManager as any ancestor will be able to consume this context with the above hook.
Extensibility
Since this is custom-built, you can customize as much as you want. For example, you could remove the messages again, after a few seconds, via a setTimeout inside the addNotification function.
If you do so, you could add some kind of indicator for how long the message will be shown (like a loading bar) or add an animation for how it appears/disappears.
Thank you for reading - if you liked this article, considering following me on Twitter to stay in to 🙌